Let’s Color Plastic Monkeys, Mermaids, Elephants, and Tiny Umbrellas Back to Life!
If you grew up in the ‘60s or ‘70s, you might remember the real stars of any fancy drink — those tiny plastic charms clinging to the rim. Maybe it was a monkey swinging from your Shirley Temple, or a pink elephant floating above the fizz. As a kid, I didn’t care what was in the glass… I just wanted that charm! I’d collect them like treasure, each one a glittery souvenir from a grown-up world of Tiki bars, velvet lounges, and pineapple slices on toothpicks.
These quirky drink companions were basically the Happy Meal toys before Happy Meals — and I’ve brought them back to life (minus the sticky fingers) with a set of vintage-inspired coloring pages! You’ll find all the classics: the monkey, elephant, mermaid, and camel — plus the tiny plastic sword that once skewered cherries and orange wedges. And of course, no retro cocktail is complete without a paper umbrella or two.
Two of the pages even invite you to play mixologist — add your own garnishes, umbrellas, and fruity flair. Go wild with the colors and create something Trader Vic himself would envy!
✨ Click the link for your free download and let’s toast to a splash of nostalgia, one crayon at a time. 🍹
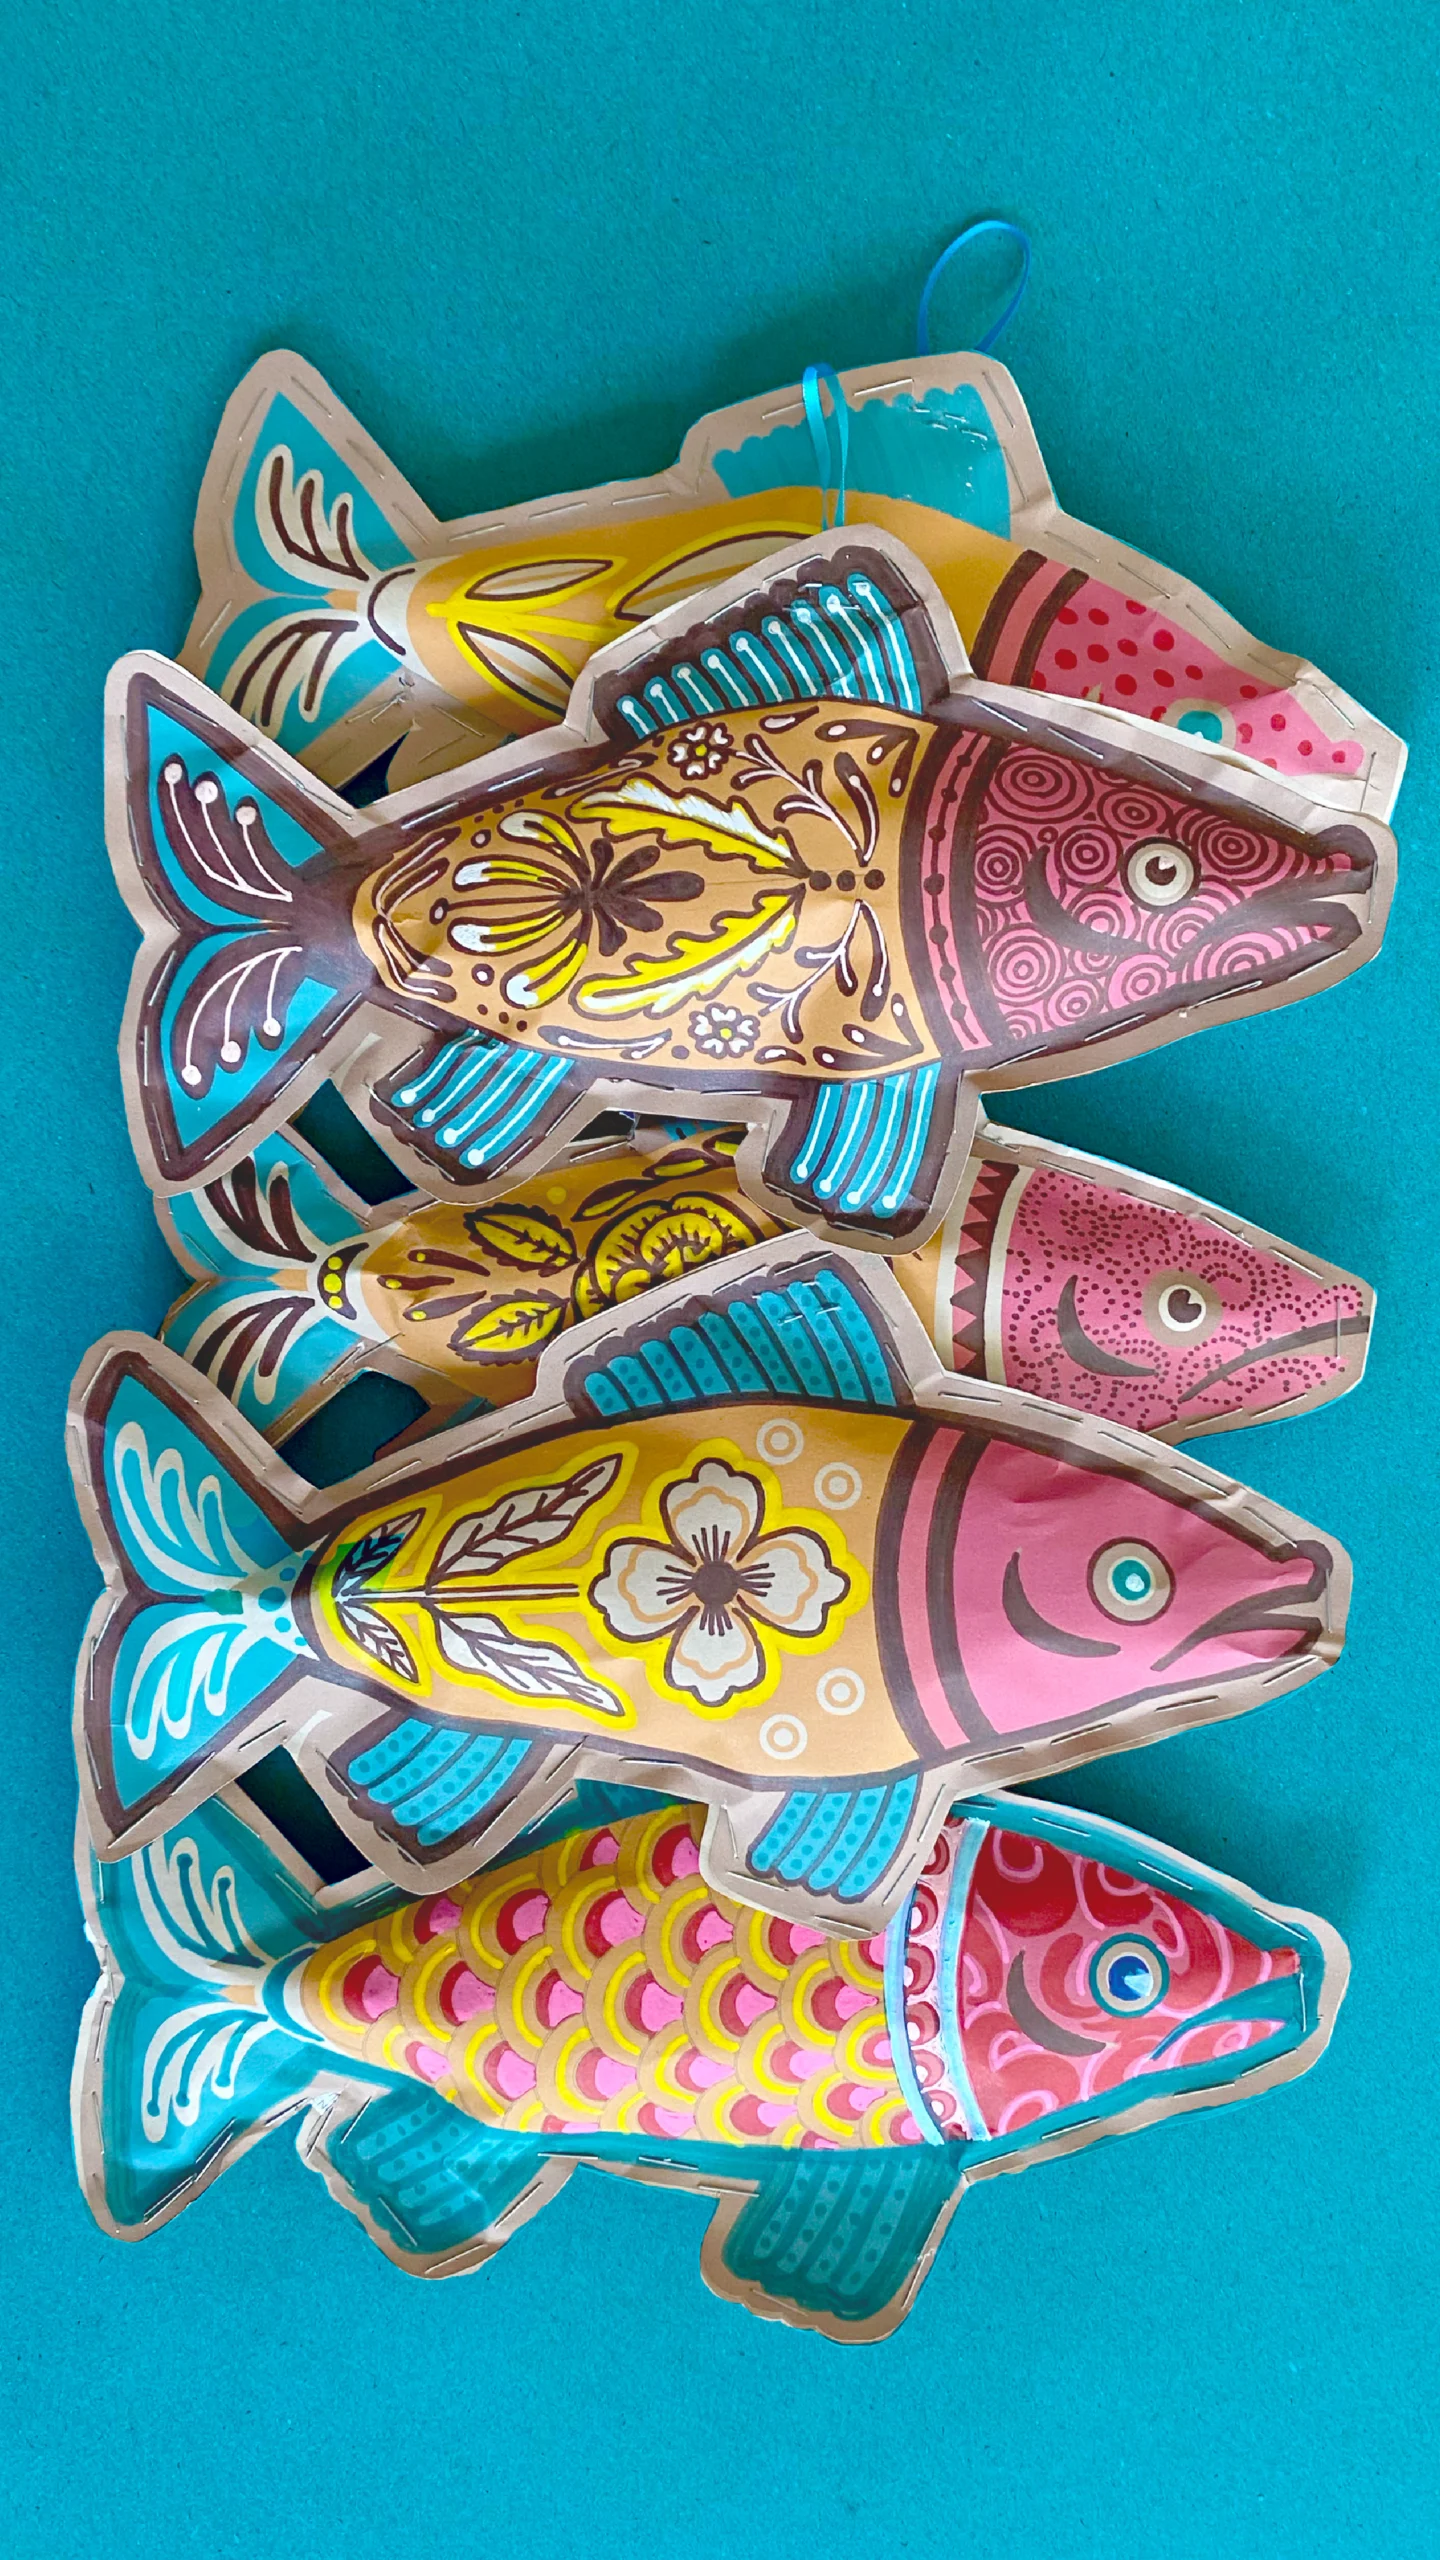
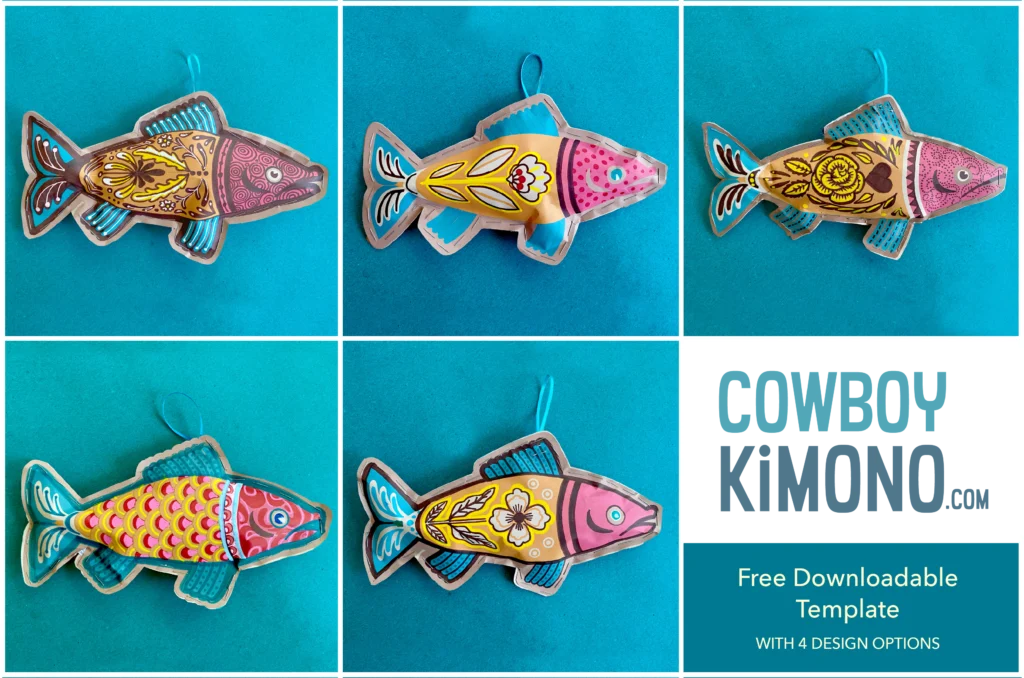
Shredded docs → sassy fish. 🐟 Reel In the Craft of the Day!
If your living room tree is more “ever-delightful” than “evergreen,” these Kraft Paper Fish Ornaments are a playful way to keep it dressed up between holidays. They’re eco-friendly, easy to make, and give you an excuse to break out the crayons, paints, and markers like a kid again. Bonus? This recycled craft adds some serious charm to your earthy, year-round tree.
Download & Print Grab the fish template and print it on letter-size Kraft paper.
Double It Up Place a blank sheet of Kraft paper behind each printed design. Hold both sheets together and cut out your fish shape. (Keep each cut-out pair together!)
Decorate Color, paint, or doodle your heart out on one side of each fish.
Staple & Stuff Lay the decorated fish on top of its blank twin. Staple halfway around the edge so it looks like cute little stitches. Leave an opening, then stuff it with shredded paper. Tuck in any strays.
Add the Hanger Cut 5-inch ribbons, knot them into loops, and staple one to the back of each fish at the top fin.
Close It Up Finish stapling around the fish to seal it in. Done!
Pro Tip: Try this same method with my other templates—birds, bugs, shells, starfish, or milagros. Mix them together for a whimsical, garden-of-delights tree that feels alive all year long.
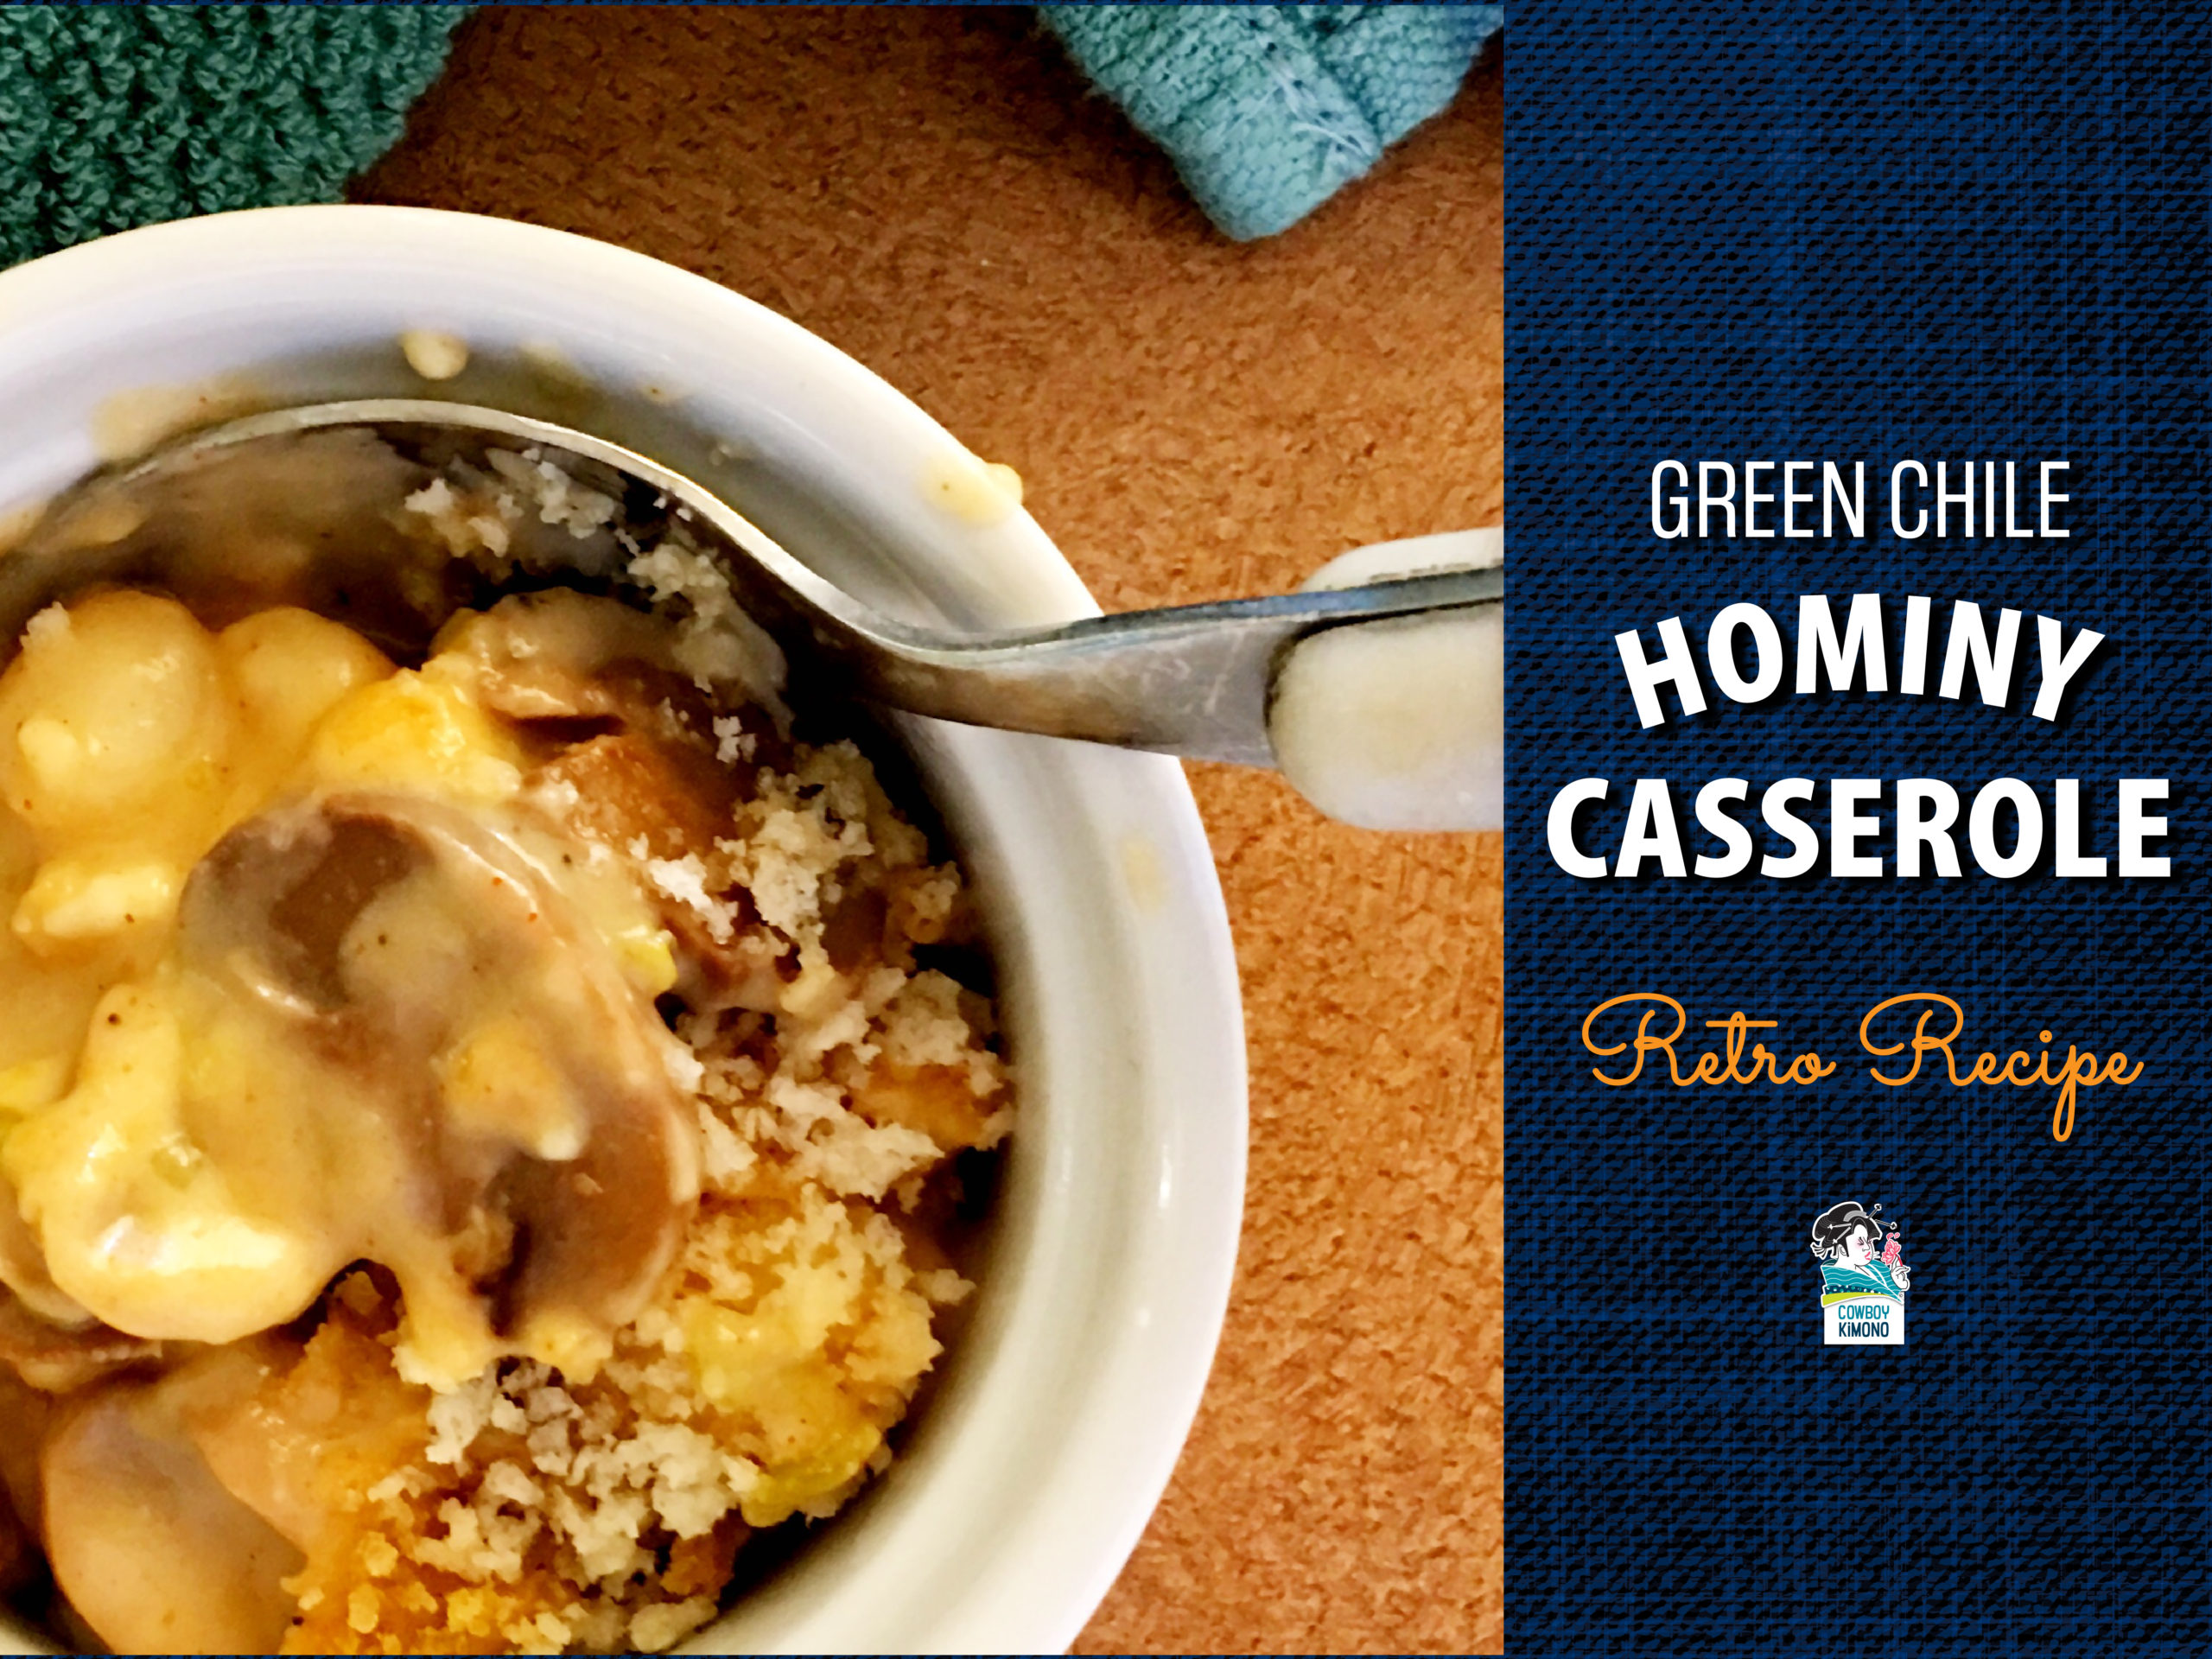
This was one of my Mom’s go-to-breakfast dishes. The original recipe had cream of mushroom soup and crushed Cornflakes which have been replaced with Bechamel sauce, mushrooms, and bread crumbs. The updated recipe is spiced up a bit with the addition of red and green chile. Great served with fried eggs and bacon.
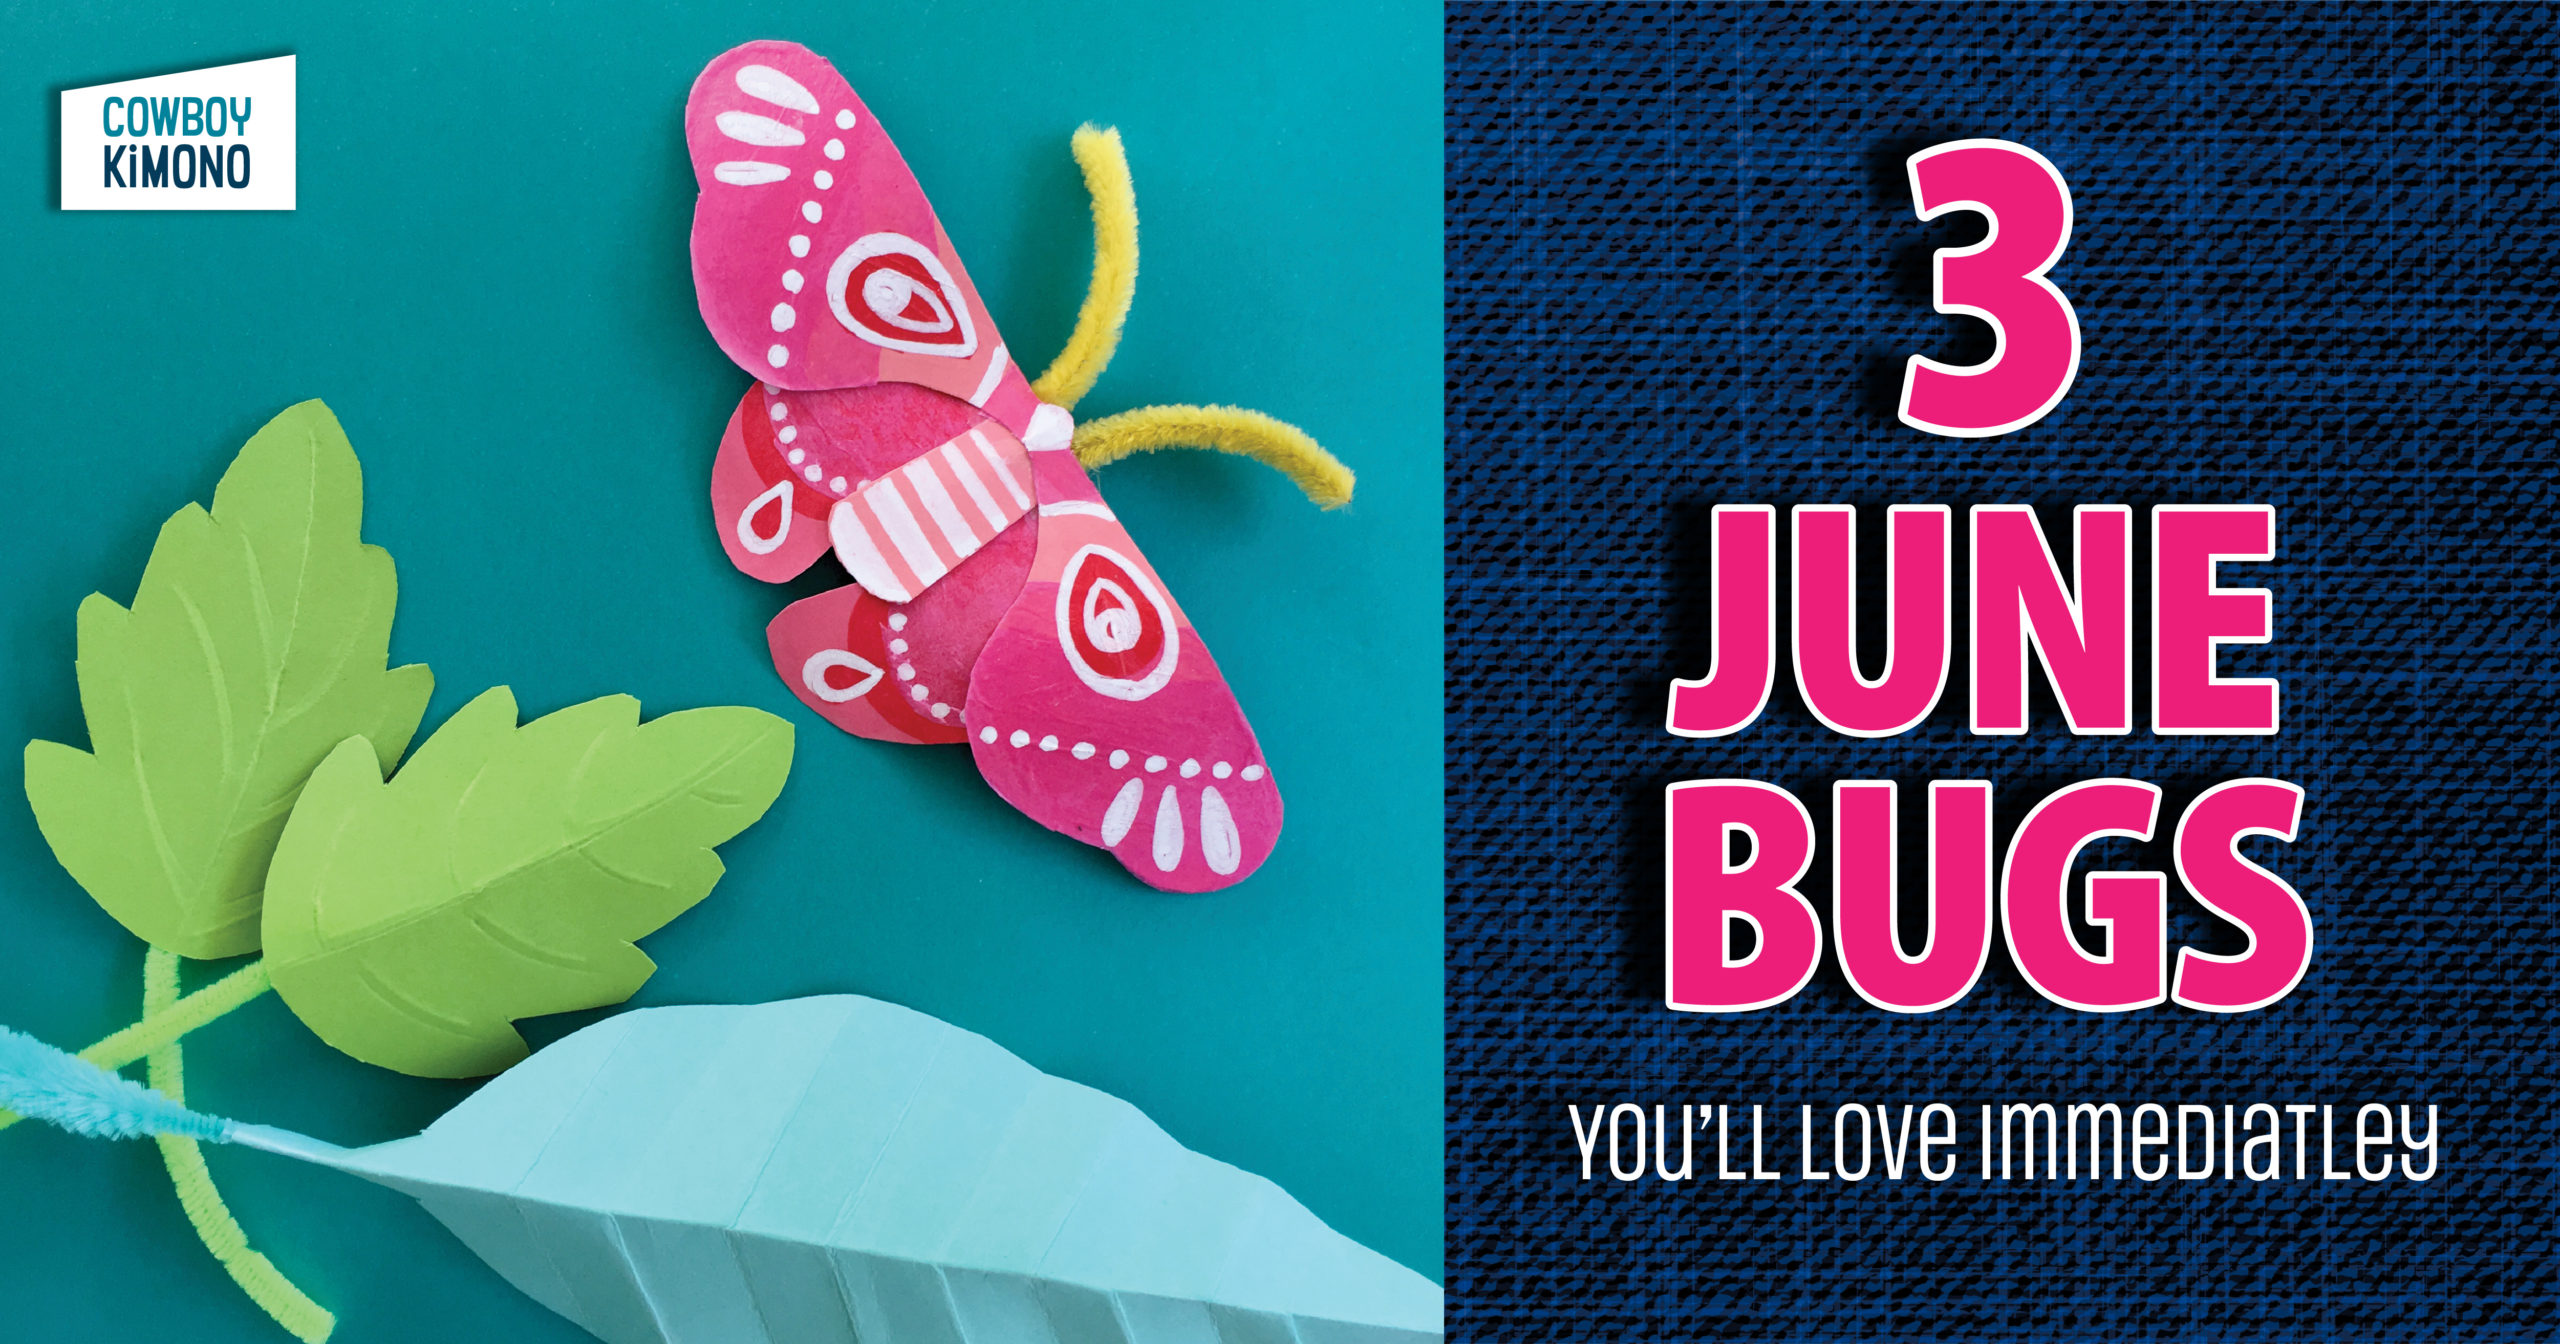
Still trying to decide if this paper craft is cuter than, happy as, or crazy as (a June bug). Either way, I’m ready to release this swarm of June bugs into my living room. The bright colored insects will serve as tree ornaments celebrating the holiday known as summer.
Paper Bug Craft
Did you know?
Real June bugs emerge from the soil at the end of spring or the beginning of the summer and are famous for bumping into porch lights and sneaking into houses. “(A June bug) Often tries to sneak into houses, either by flying right in when the door is open, or by hitching a ride on somebody’s clothes like a little ninja. Harmless to humans and cannot bite. Despite their name, they can come out as early as May.”URBAN DICTIONARY
June bugs are related to scarabs from ancient Egyptian iconography. TERMINIX FACT
June bugs have a spiritual side. They show how to balance and remain grounded. METAPHYSICALSCIENCES2012 Learn more about their SPIRITUAL MEANING
Either trace bug pieces and leaves onto colored paper using transfer paper or pinch template and paper together and trim.
Gently curl wings using a writing element with a curved exterior – like a marker. Hold the element like a wand, place it under a wing with your thumb on top of the wing and gently pull from the inside to the outside of the wing. Repeat for each wing.
Decorate bug pieces as you choose. Some ideas: paint ombre gradients, draw tangle patterns with markers, layer colored tissue paper with Mod Podge, glue yarn in swirly patterns. Stuck? I got a lot of inspiration from my Pinterest collection of beautiful bug art: bug_inspiration
Attach layers using scotch tape or glue. Layering formula for each bug is shown at the bottom of templates.
Attach googly eyes. The moth doesn’t have room on its head for the eyes, but they can be glued to the wings!
Cut and bend chenille stems to match the legs and antennae shown on each template. Tape in place on the back/undecorated side of the bugs.
Fold leaves as shown on the bottom of each template. Veins can be added by drawing and applying gentle pressure on the back with a dull pencil.
Once your paper June bugs are ready to swarm, you can strategically place them in houseplants, decorate a year-round holiday tree, give them to friends named, “June,” or use them to decorate the fridge door!
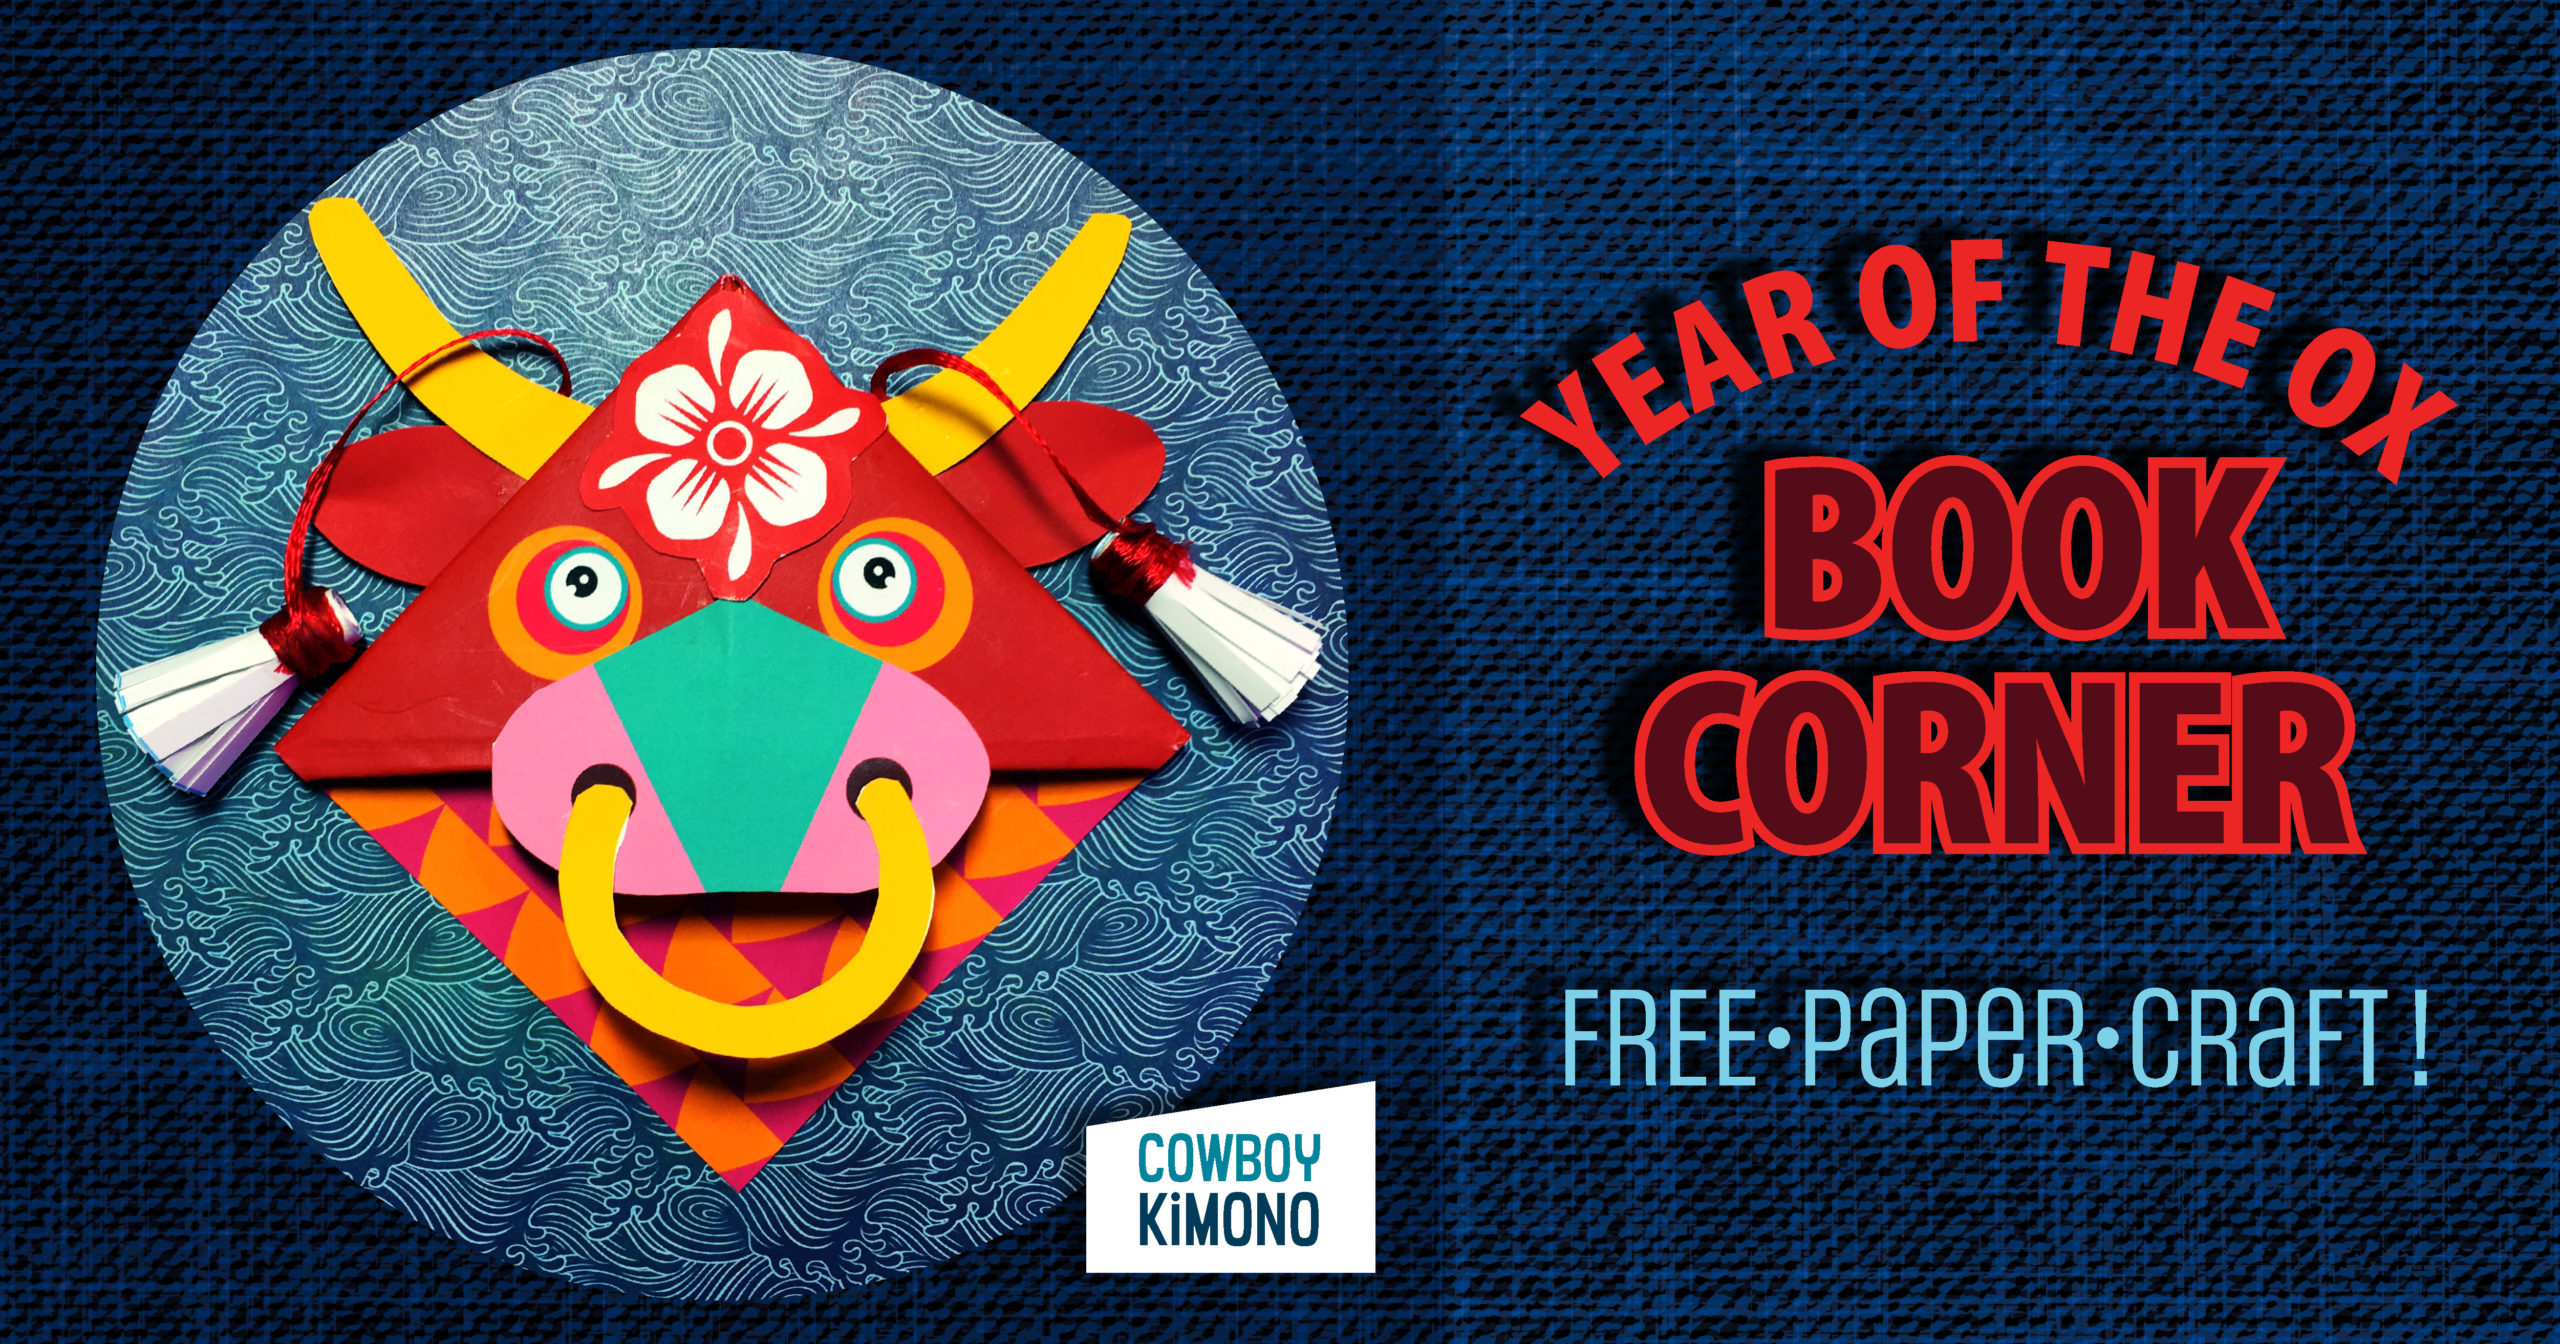
An irresistible paper craft originally created to celebrate the Year of the Ox, 2021. Simple instructions follow – but first a brief history of the Lunar New Year from Pinterest:
Celebration of Luck, Health, and Togetherness
“Marking the first new moon of calendars traditional to many East Asian countries, Lunar New Year is a multi-day celebration of luck, health and togetherness celebrated by billions of people around the world. February 12 marks this year’s festivities, beckoning in the Year of the Ox according to the Chinese zodiac. And while this year’s celebrations may be at home this year, the rich traditions of this holiday aren’t going anywhere.“
How Lunar New Year Came To Be
“The legends behind the Lunar New Year date back thousands of years. The tale goes that at the beginning of each new year, there was a monster that attacked a village. The monster was afraid of loud noise, bright lights and the color red, so the villagers banded together to scare it off by hosting loud celebrations and wearing red. Each year is represented by a different animal, the 12 signs of the Chinese zodiac, with this year represented by the ox, which symbolizes patience and cheerfulness. The Chinese zodiac has been adopted by many countries throughout Asia. Lunar New Year is celebrated in a variety of ways across different Asian cultures. For example, in China, the celebration is often called the Spring Festival, in Tibet it’s known as Losar, and in Vietnam, it’s called Tết. It’s widely celebrated amongst the Asian diaspora all over the world, making it a truly global holiday.” https://www.pinterest.com/today/article/how-to-celebrate-lunar-new-year-2021/64041/
Print template’s front square, flip paper and print back on same page.
Cut out red square from the printed page.
Fold origami bookmark using photo guide or YouTube video link
Cut out nose, ears, head flower, nose ring, horns and tassel strips.
Clip tassel strips as shown in photo (below).
Glue nose beneath eyes, making sure not to glue the pocket opening. Glue the nose ring to the nostrils.
Gently pinch each ear on the tip and glue to the back side of the head.
Glue the horns slightly above the ears.
Glue the head flower over the printed flower.
Make the tassels by putting a dot of glue on the left and right, unclipped edge of each strip. Place the tip of a 3-inch piece of yarn or thin ribbon in the glue with the remaining length going up and away from the unclipped edge. Repeat for the second strip. Tightly roll each strip lengthwise. Pinch for a few seconds to allow the glue to take hold. Put a dot of glue on the top, unclipped part of the tassel and wrap with a 2-inch piece of yarn or thin ribbon. Glue the end and repeat for the second tassel. Tie the tassels together at the top and glue the knot to the back side, center of the head.
You can catch a rare celestial event the evening of December 21, 2020 when the two largest planets in our solar system – Jupiter and Saturn – nearly overlap to form a “double planet.” This cosmic conjunction will occur on Winter Solstice marking the shortest day and longest night of the year. How rare is this occurrence? The last time a close conjunction of Jupiter and Saturn occurred was about 800 years ago and isn’t expected to happen again until 2080!
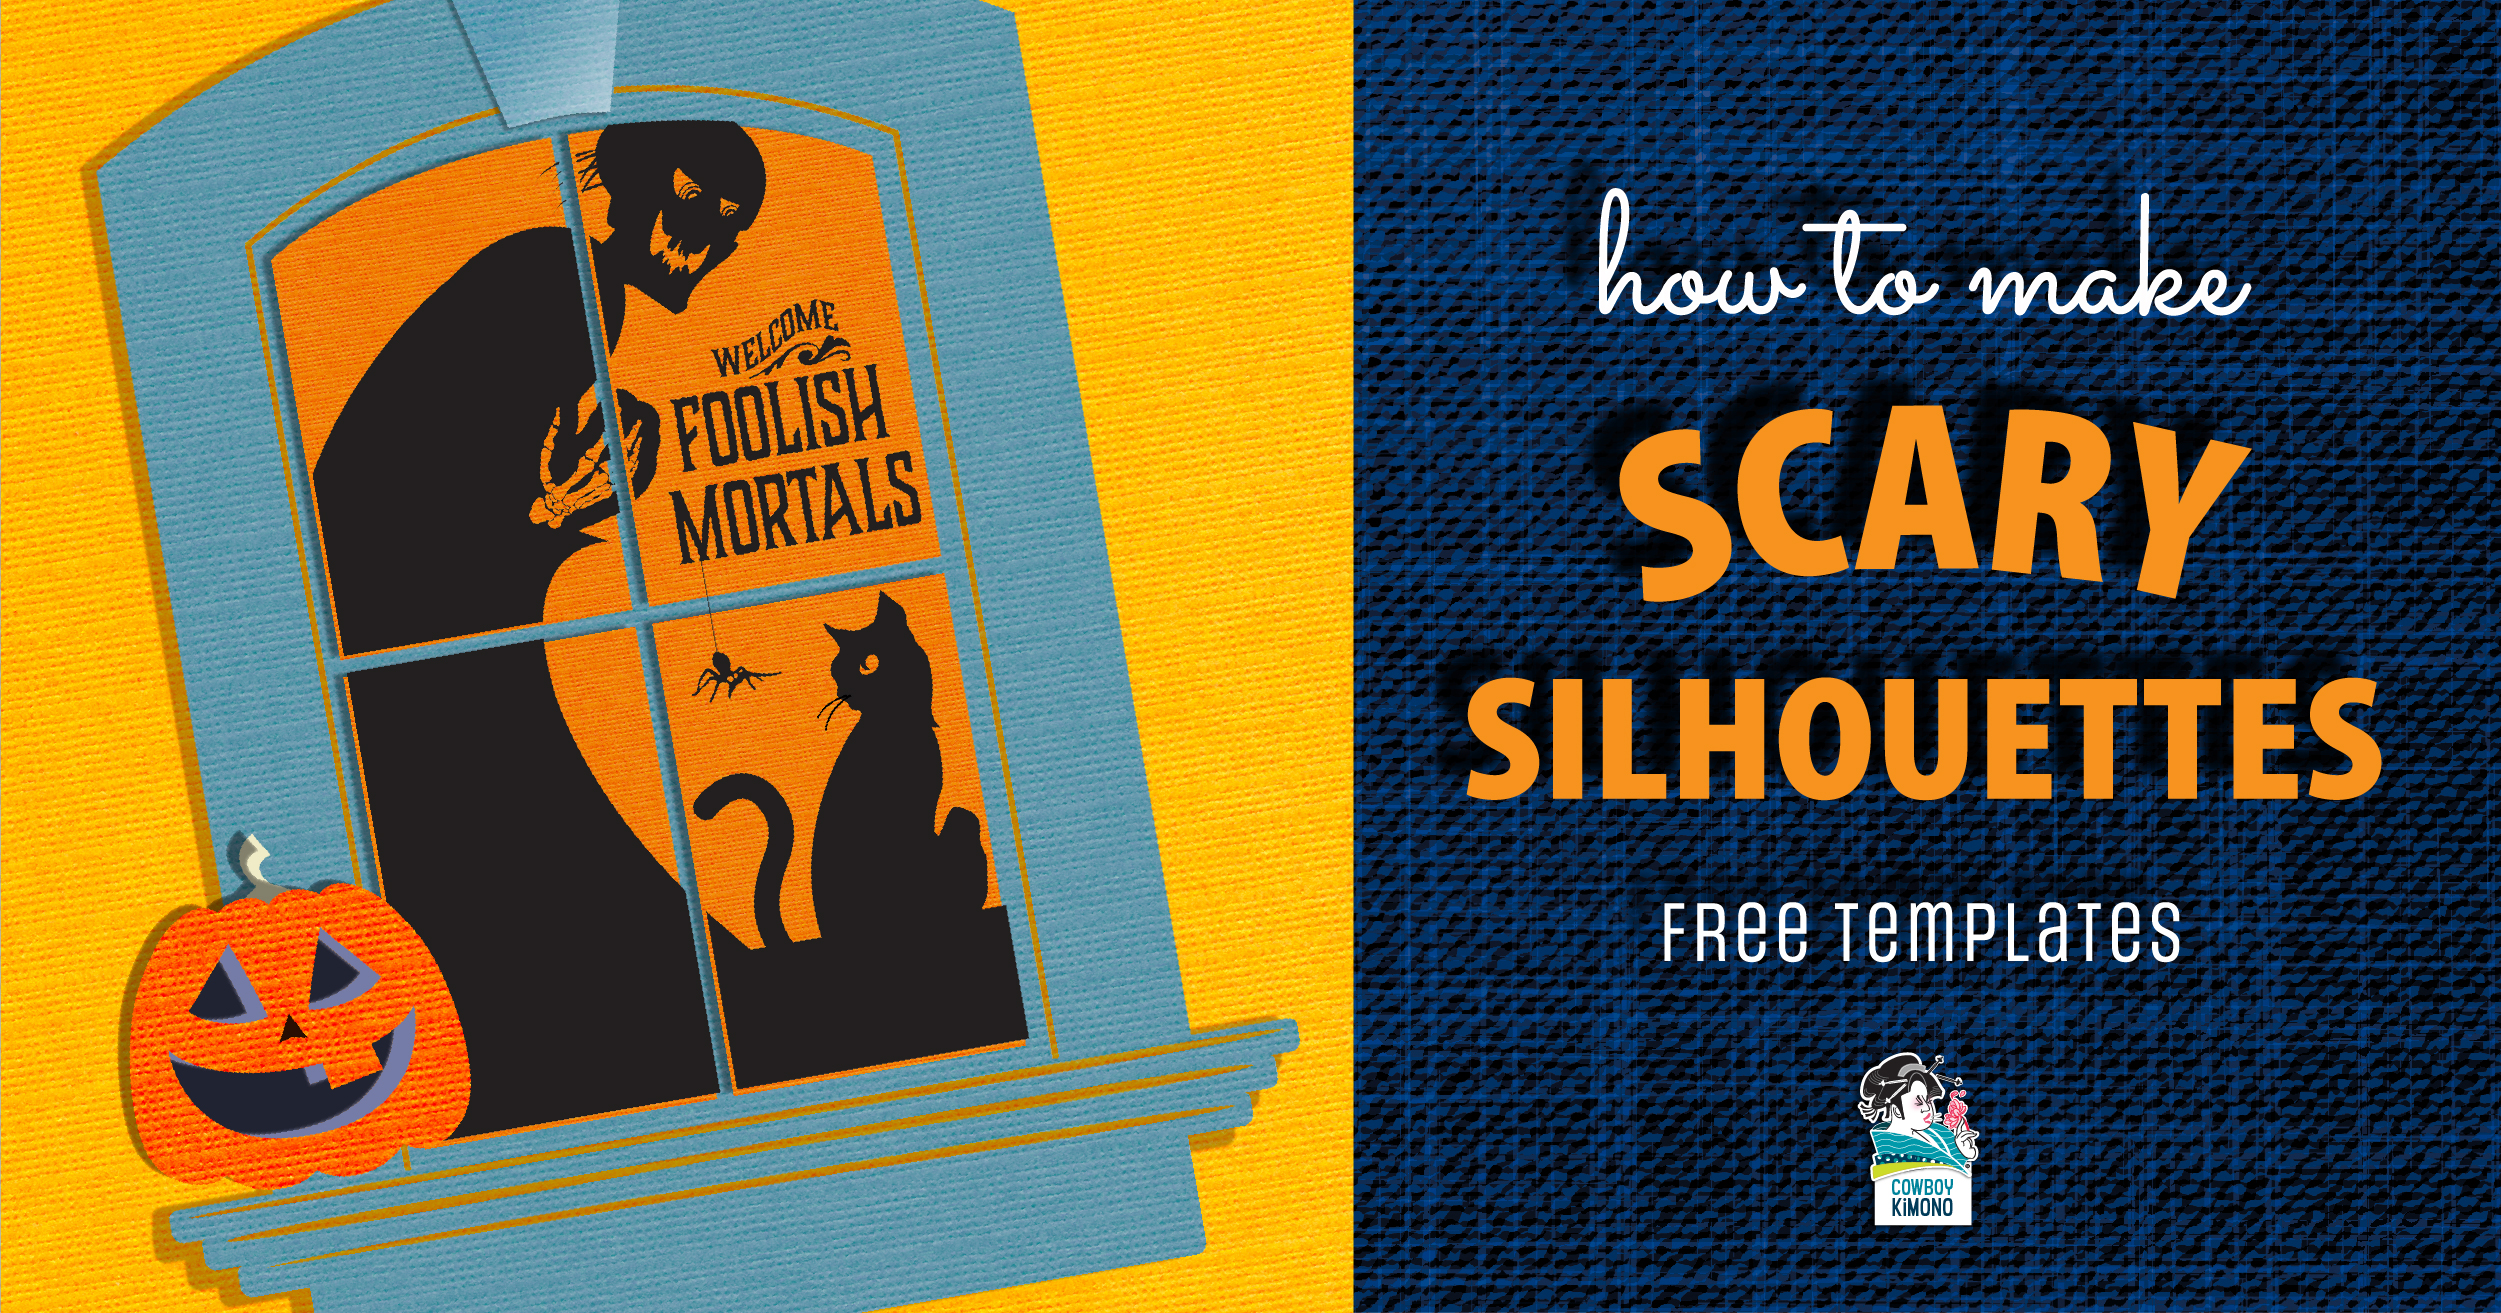
Want to warn would be trick-or-treaters with scary silhouettes? Create this big foreboding sign on a window or glass door with ease using large, inexpensive black and white prints. Glass with lights, light-colored shades, or a light-colored door behind them provide the best contrast for these dark silhouettes. In just a few hours. I’m able to upload files online, have 18″x 24″ black and white blueprints made, and pick them up at my local Staples. Click the button below for details and pricing on Staples Blueprints.
Start by printing the ghoul, cat, spider, and/or phrase to fit in a window or storm door. Click for 18″ x 24″ templates. I printed them to fit on a storm door, arranged the prints behind the glass and drew on the front of the glass with black Uni-Posca markers (extra broad, broad and medium). I have used these paint markers on glass before and was confident that I could clean the paint off without damaging the storm door. Make sure to test a small area of your surface with the paint markers before drawing/painting silhouettes. If you cannot easily clean off the dried paint marker, try the cut paper method.
Silhouettes painted on a glass screen door
Cut Paper Method
Start by printing the ghoul, cat, spider, and/or phrase to fit in a window or storm door. Trim the characters and letters, removing the white paper sections. Place the prints behind the glass window or door and tape with scotch tape or double stick tape.
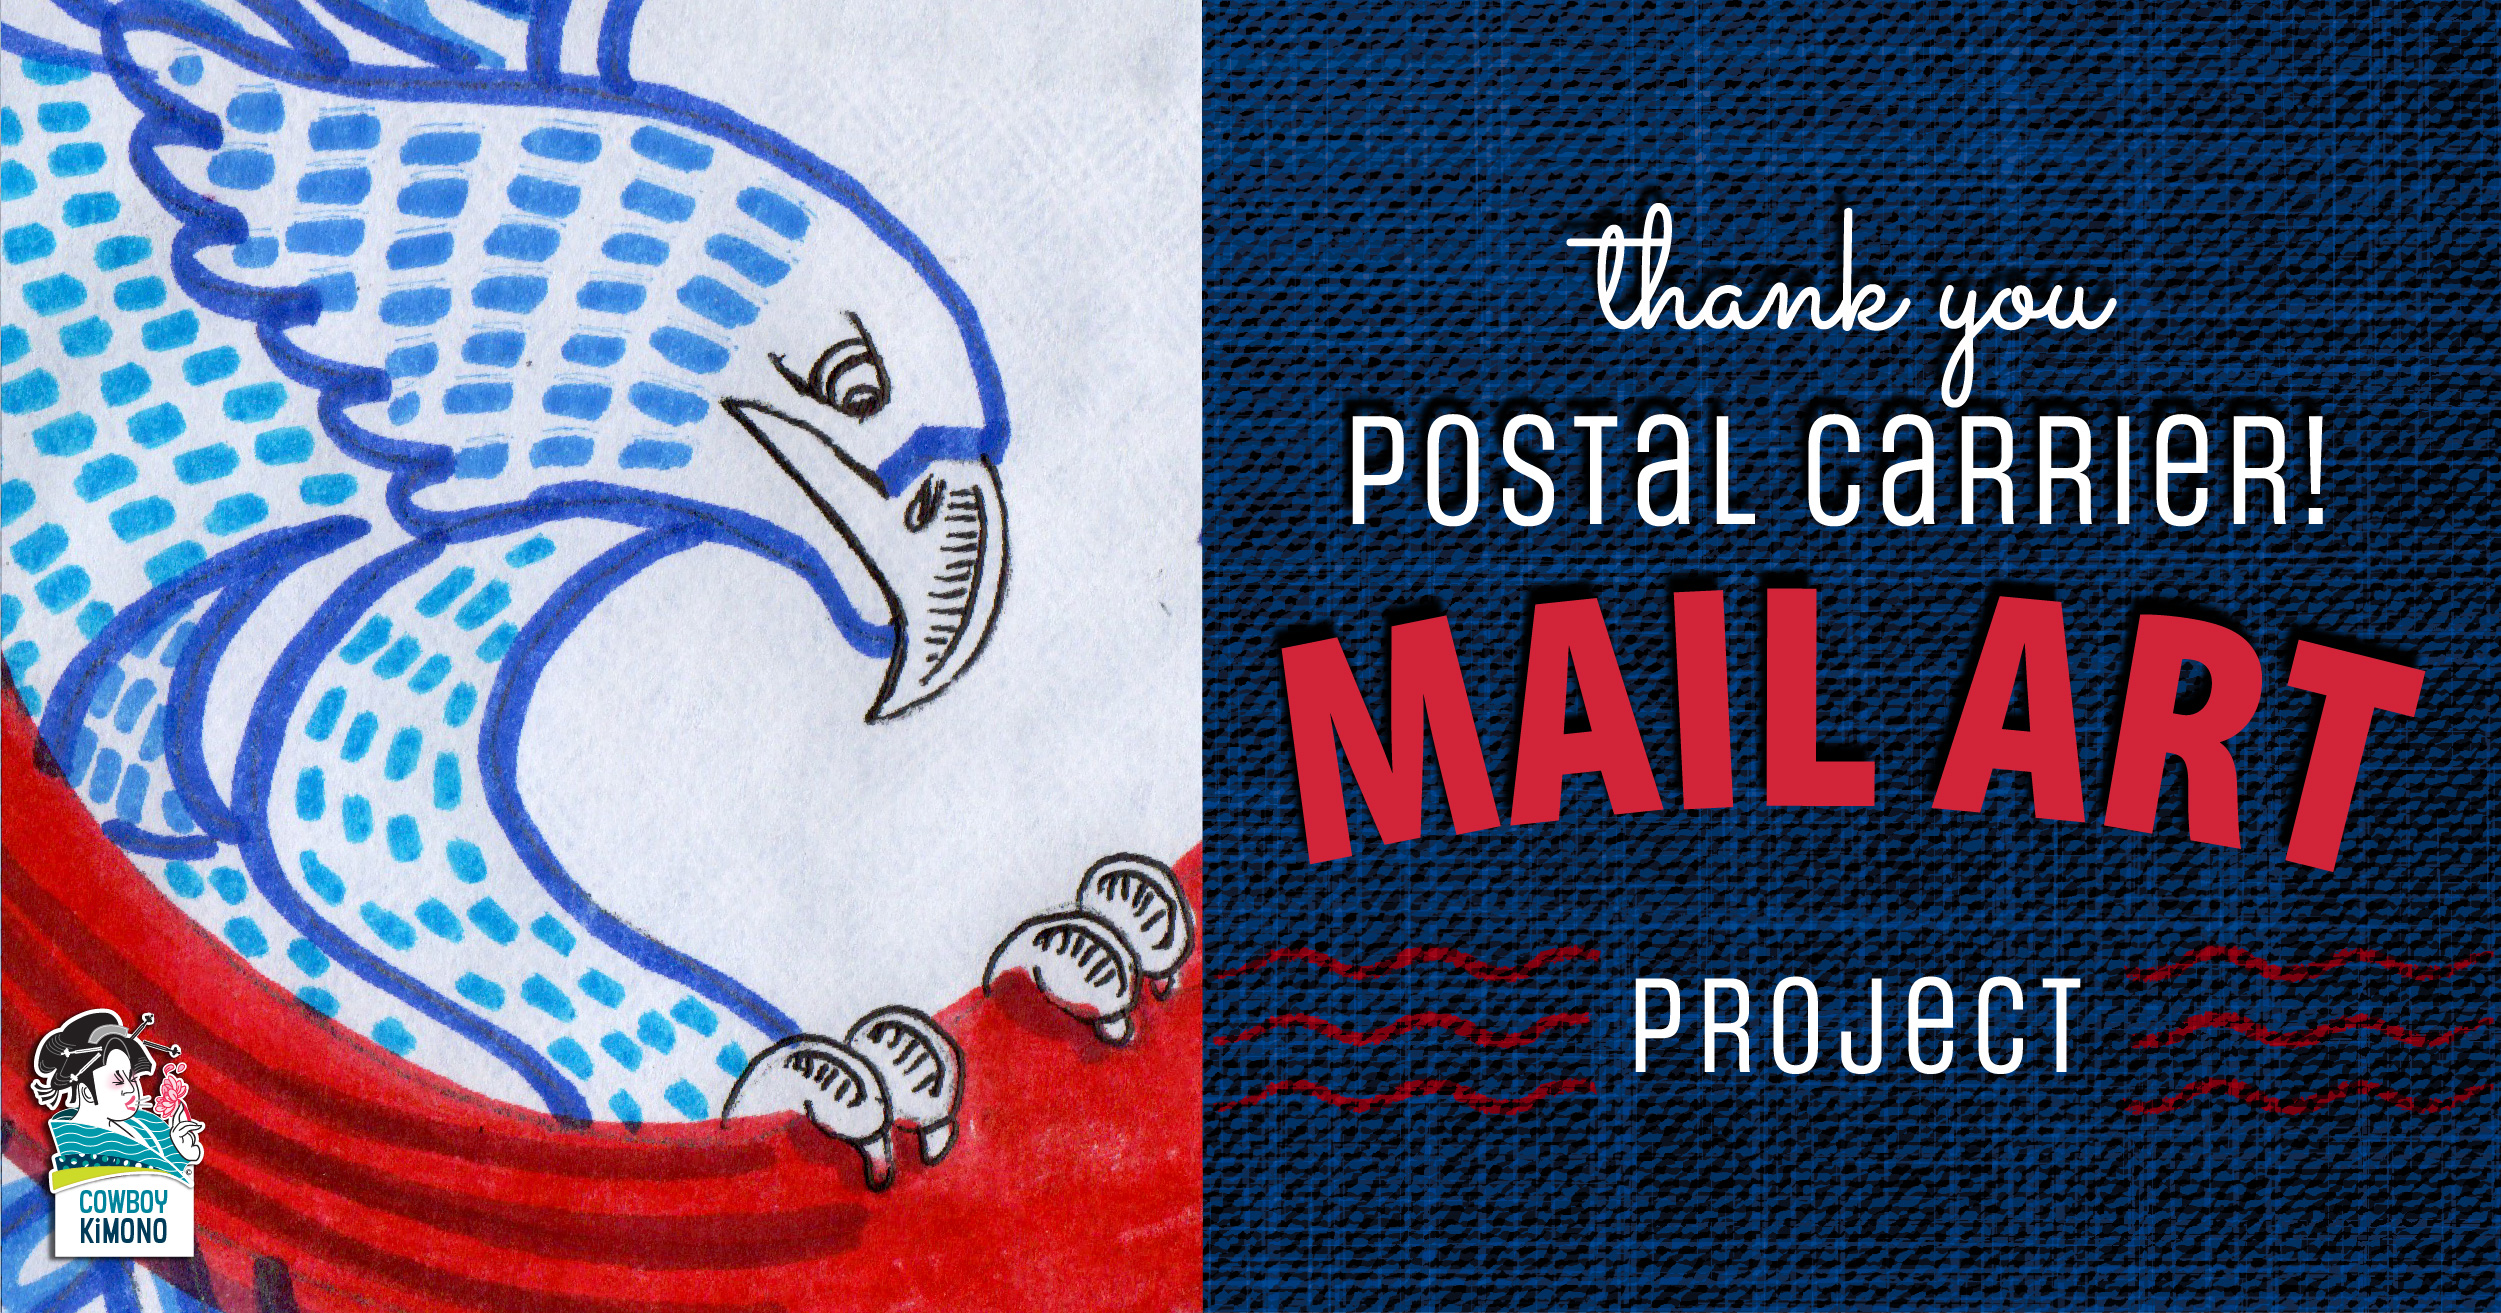
“…nor gloom of night stays these couriers from the swift completion of their appointed rounds”
The events and pitfalls of 2020 may fully qualify as “gloom of night.” In addition to the looming holiday crush season, USPS workers are facing a barrage of election mail heaped with homebound and remote worker’s increasing needs. My reliance on the carrier that brings essential communication and products to my door has grown, big time. I think it is time to let my mail carrier know how much I appreciate the dedication, doggedness, drive, and grit that is required to do the job. Here is the project I created just for that purpose:
Print the eagle envelope template and thank you page.
Trim the template along the artwork’s border to fit a standard #10 envelope.
Using two small pieces of masking tape, gently tape the paper template to your envelope. Tuck a piece of transfer paper between the paper and the envelope. Test to make sure the transfer paper is imprinting onto the envelope (not the back of the template).
Trace the image with a ballpoint pen to transfer it to the envelope.
Carefully remove the masking tape and template.
Color the eagle, banner and message with markers.
To create a tri-fold, fold the thank you page along the dotted line, then the top of the page to the dashed line.
Cut along the vertical dashed lines to the horizontal dotted line (your first fold). This will make your pull-apart/pull-off thingy’s.
Finish by folding the pull-apart/pull-off thingy’s under the top flap and place into your hand decorated envelope.
Creating a Labor Day craft stumped me for a bit. So, I looked up the holiday’s origins and the real reason for its existence:” Labor Day pays tribute to the contributions and achievements of American workers ” (www.history.com)
Although this craft does not bid summer adieu, it does focus on the contributions and achievements of workers. Labor Day – What a great opportunity to thank the many workers who have met this year’s challenges with gusto!
Simply print the Thank You flyer, clip along the dashed lines, and deliver to the hard workers you’ve come to appreciate more than ever.
My list of hard workers begins with: Mail Carriers, Utility Workers, Grocery Stockers, Cashiers, Security Guards, Veterinarians, Health Care Workers, Truck Drivers, Census Takers, etc….!
Give Dad the gift of sleeping in on Father’s Day by whipping up a batch of apple muffins the night before (feel free to bang the pots and pans until bedtime). Once the white of his eyes are visible, dash in with a pyramid of apple muffins topped with this funny, yet loving, sentiment. Crumbs between the sheets may be the only downside to this breakfast in bed.