Tag: quirky

Unconventional and delightfully offbeat — projects or pieces that make you smile with their uniqueness.

  • How to Create a Hip Jackalope Display

    How to Create a Hip Jackalope Display

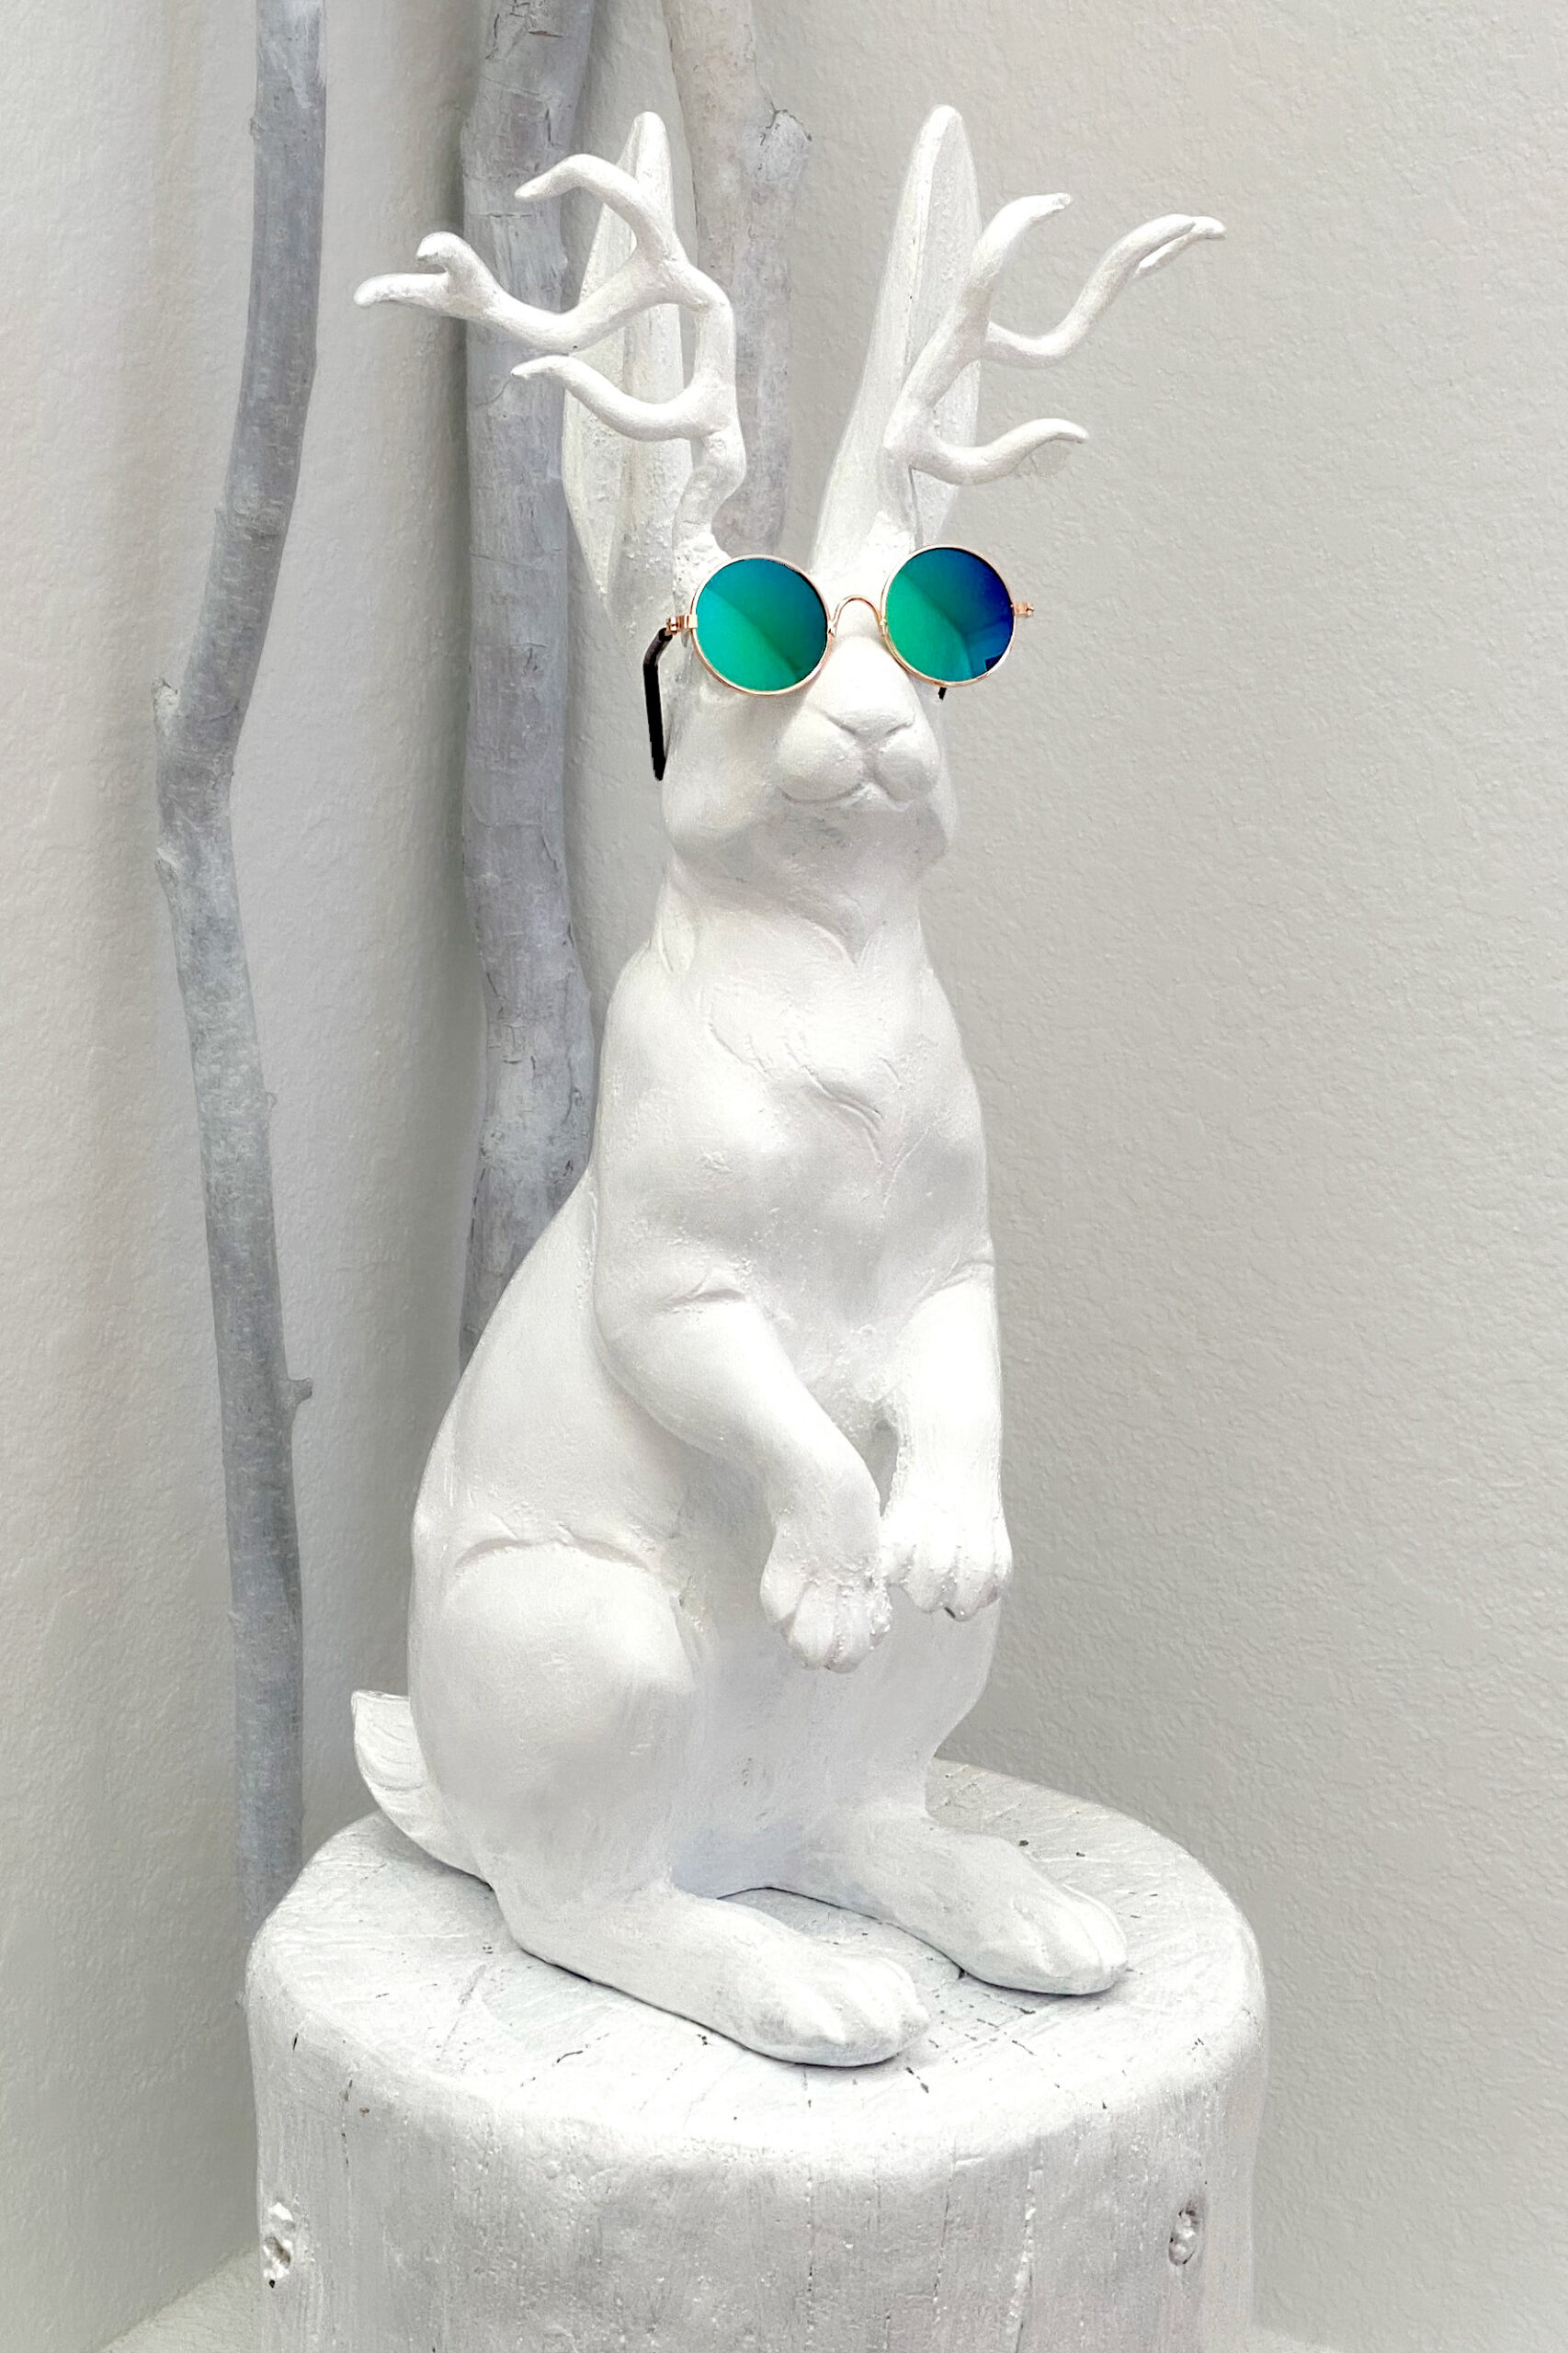
    This quirky little garden project began with a plain old cement rabbit from a local garden store—and ended in one of my favorite creations yet: a hip jackalope garden display that brings personality and humor to any outdoor space.

    Finished jackalope garden display with groovy glasses
    Groovy garden vibes with this jackalope statue 🕶️🦌

    Materials I Used

    • Concrete rabbit ornament – from local nursery
    • Apoxie Sculpt – for antlers
    • Acrylic paint – Blick & Michaels (colors used: warm brown, black, white)
    • 3D fabric paint – for texture details
    • Plastic novelty sunglasses – Etsy

    How to Build a Jackalope Garden Display (Step-by-Step)

    Step 1: Base Clean & Prime
    Clean your cement rabbit thoroughly. I used a stiff brush to remove dirt, then gave it a rinse and let it dry in the sun. A layer of white gesso helped the paint stick better.

    Step 2: Build the Antlers
    Using Apoxie Sculpt, I formed two simple antlers—kind of like big branching Y’s. Let them cure fully overnight, then lightly sanded the surface for better paint adhesion.

    Step 3: Paint & Detail
    Paint the rabbit in your desired color scheme. I went with desert tones—brown body, soft white chest, and black outlines for pop. Once dry, I added 3D puff paint for extra texture along the fur lines and ears.

    Step 4: Accessorize
    The finishing touch was a pair of novelty sunglasses I picked up from Etsy. I hot-glued these right onto the snout for max cool factor.

    Close-up of sunglasses on jackalope garden statue
    Shady and serene 🌵

    Why I Made This

    I was going through a tough time mentally when I began this project. Sculpting the antlers and painting slowly over a few days felt like a form of meditative healing. Giving a bunny antlers and calling it a jackalope somehow gave me a laugh I really needed—and now it brings that joy to everyone who sees it in my front yard.

    Final Thoughts

    If you’re looking to combine playfulness, art, and a little bit of desert folklore into one project, the jackalope garden display is it. Whether you’re gifting it, auctioning it, or just sprucing up your own yard, this DIY jackalope will absolutely steal the show.

    🦌 See the full Jackalope tutorial on Cowboy Kimono

    Connect with us:

    InstagramFacebookPinterestEtsy Shop

  • Paint a One-Of-A-Kind Sofa Table

    Paint a One-Of-A-Kind Sofa Table

    What is one way to hide a chaotic heap of twisted cords beneath a colossal TV screen? My solution includes strategically positioning a visual diversion: A custom console styled with arty pots on the bottom and a Nambé bowl on the top. This project is for a home with an interior that is a nice mix of Modern and Ethnic Chic. (What is Ethnic Chic?)

    Materials

    Materials needed for project: table, drawer knobs, paint color, and paint marker

    How To

    I’ve been pinning images of illustrated furniture for years. This project was my chance to dive in and give it a try. I found an unpainted sofa table that was the right size and style. Once the table was assembled, I removed the knobs, pulled out the drawer, and lightly sanded and primed all surfaces. Then I coated it with a few layers of satin latex paint and gave the drawer slides a very light coat to keep them in good sliding condition. I created an illustration the same dimensions as the drawer front using Adobe Illustrator. Next, I printed the illustration to size and it became my pattern. I traced the artwork by sandwiching a sheet of Saral Transfer paper between the print out and the drawer face. After the artwork was transferred to the drawer front, I drew on top of the traced image with a paint pen. NOTE: It was really important to let each layer dry the recommended amount of time, as well as, lightly sand between coats. After all the paint had cured for two weeks, I covered the table with several coats of poly acrylic (again – pay attention to drying times and sanding between coats). I rubbed a bar of soap on the drawer slides to improve their glide and attached the knobs. Kinda cool. Kinda artsy. I heart.

    painted console with southwestern roadrunner graphic

    Connect with us:

    InstagramFacebookPinterestEtsy Shop

  • Vines! Sacred Hearts! Itty Bitty Jean Jacket

    Vines! Sacred Hearts! Itty Bitty Jean Jacket

    Child Sized Jacket (Painted Sleeves and Front Panels)

    A new addition to Cowboy Kimono’s Etsy store, this recycled jean jacket has bright green and turquoise vines climbing up each sleeve and shoulders capped with a sacred heart. The “Martian” leaf motif continues on the front panels beneath the pockets, contrasting with the deep indigo blue of the denim. Dimensional paint creates faux embroidery accents. It’s good to know that this child size jacket is washable, durable and one-of-a-kind!

  • Irresistible Paper Ox Book Corner

    Irresistible Paper Ox Book Corner

    An irresistible paper craft originally created to celebrate the Year of the Ox, 2021. Simple instructions follow – but first a brief history of the Lunar New Year from Pinterest:

    Celebration of Luck, Health, and Togetherness

    Marking the first new moon of calendars traditional to many East Asian countries, Lunar New Year is a multi-day celebration of luck, health and togetherness celebrated by billions of people around the world. February 12 marks this year’s festivities, beckoning in the Year of the Ox according to the Chinese zodiac. And while this year’s celebrations may be at home this year, the rich traditions of this holiday aren’t going anywhere.

    How Lunar New Year Came To Be

    The legends behind the Lunar New Year date back thousands of years. The tale goes that at the beginning of each new year, there was a monster that attacked a village. The monster was afraid of loud noise, bright lights and the color red, so the villagers banded together to scare it off by hosting loud celebrations and wearing red. Each year is represented by a different animal, the 12 signs of the Chinese zodiac, with this year represented by the ox, which symbolizes patience and cheerfulness. The Chinese zodiac has been adopted by many countries throughout Asia. Lunar New Year is celebrated in a variety of ways across different Asian cultures. For example, in China, the celebration is often called the Spring Festival, in Tibet it’s known as Losar, and in Vietnam, it’s called Tết. It’s widely celebrated amongst the Asian diaspora all over the world, making it a truly global holiday.https://www.pinterest.com/today/article/how-to-celebrate-lunar-new-year-2021/64041/


    Supplies

    • Printed and cut-out origami square 
    • Printed and cut-out ox features
    • Printed and cut-out tassel strips
    • 2 – 3 inch pieces of yarn or thin ribbon
    • 2 – 2 inch pieces of yarn or thin ribbon
    • Glue
    • Glue stick
    • Scissors

    Directions

    1. Print template’s front square, flip paper and print back on same page.
    2. Cut out red square from the printed page.
    3. Fold origami bookmark using photo guide or YouTube video link
    4. Cut out nose, ears, head flower, nose ring, horns and tassel strips.
    5. Clip tassel strips as shown in photo (below).
    6. Glue nose beneath eyes, making sure not to glue the pocket opening. Glue the nose ring to the nostrils.
    7. Gently pinch each ear on the tip and glue to the back side of the head.
    8. Glue the horns slightly above the ears.
    9. Glue the head flower over the printed flower.
    10. Make the tassels by putting a dot of glue on the left and right, unclipped edge of each strip. Place the tip of a 3-inch piece of yarn or thin ribbon in the glue with the remaining length going up and away from the unclipped edge. Repeat for the second strip. Tightly roll each strip lengthwise. Pinch for a few seconds to allow the glue to take hold. Put a dot of glue on the top, unclipped part of the tassel and wrap with a 2-inch piece of yarn or thin ribbon. Glue the end and repeat for the second tassel. Tie the tassels together at the top and glue the knot to the back side, center of the head.
    Clip tassel strip up to dotted line
    https://youtu.be/BEwl0fvqo18
     
  • Create a Kickass Thank You for your Mail Carrier

    Create a Kickass Thank You for your Mail Carrier

    “…nor gloom of night stays these couriers from the swift completion of their appointed rounds

    The events and pitfalls of 2020 may fully qualify as “gloom of night.” In addition to the looming holiday crush season, USPS workers are facing a barrage of election mail heaped with homebound and remote worker’s increasing needs. My reliance on the carrier that brings essential communication and products to my door has grown, big time. I think it is time to let my mail carrier know how much I appreciate the dedication, doggedness, drive, and grit that is required to do the job. Here is the project I created just for that purpose:

    How to create the mail art using markers

    Supplies

    Directions

    1. Print the eagle envelope template and thank you page.
    2. Trim the template along the artwork’s border to fit a standard #10 envelope.
    3. Using two small pieces of masking tape, gently tape the paper template to your envelope. Tuck a piece of transfer paper between the paper and the envelope. Test to make sure the transfer paper is imprinting onto the envelope (not the back of the template).
    4. Trace the image with a ballpoint pen to transfer it to the envelope.
    5. Carefully remove the masking tape and template.
    6. Color the eagle, banner and message with markers.
    7. To create a tri-fold, fold the thank you page along the dotted line, then the top of the page to the dashed line.
    8. Cut along the vertical dashed lines to the horizontal dotted line (your first fold). This will make your pull-apart/pull-off thingy’s.
    9. Finish by folding the pull-apart/pull-off thingy’s under the top flap and place into your hand decorated envelope.

  • The Bright Side of Social Distancing

    The Bright Side of Social Distancing

    One of the emerging side-effects of social distancing is our remarkable ability to use limited resources in unconventional ways. The 2020 Quarantine is proving that scarcity + isolation = mighty springboards for creative work-arounds. 

    1. Zoom and Skype Set Design 

    Brilliant homebound workers camouflage bed heads, tweak waist-up wardrobes, and map-out ideal camera angles without hiring digital marketing teams.

    2. Pantry Mixology 

    Newcomers to day drinking re-craft cocktails and make the most of what’s left on the shelf. Got maple syrup and BBQ sauce? Go!

    3. Transportation Revolution

    Cycling enthusiasts tackle social-distancing and devise awe-inspiring alternatives.

    4. Light in a Dark Time

    Families build outdoor displays using programmable LED lights and imagination to deflate doom and gloom.

    5. Artificial Globetrotting

    Park the private jet – humorous Staycations break new ground.

    6. Coded Cursing

    Resourceful parents breathe new life into their high school Spanish or create secret languages to shout expletives without their homebound kids understanding a single word.

    7. Songs That Bond

    Virtual choirs generate entertaining lockdown tunes, opera parodies, and hand washing ditties to amuse themselves and divert family squabbles

  • Cactus Patch Mail Art

    Cactus Patch Mail Art

    A finished Cactus Patch Mail Art. Displaying a vibrant hand drawn cactus plant.
    Cactus Patch Mail Art

    What You’ll need to create this Cactus Patch Mail Art Masterpiece for Yourself:

    Supplies

    • Envelope
    • Studio Series Alcohol Dual-Tip Marker Set (available at Pennysmiths Paper)
    • Uniball Signo White Pen, Broad (available at Pennysmiths Paper)
    • 1 sheet heavyweight paper, cut to fit inside the envelope
    • 1 sheet heavyweight paper, to protect the surface where you are working
    • Post-it Notes
    • Mailing Label (optional)

    Cactus Patch Art How-To:

    Steps

    1. Start by placing post-it notes on the front of the envelope over the address area to keep it the same color as the envelope.
    2. Insert a cut sheet of heavyweight paper inside the envelope to keep the markers from bleeding onto the backside.
    3. Select 3-4 harmonious colors (these would be next to each other on the color wheel or all the same color family). Blues or greens work well. Go a bit wilder by using orange, yellow and red or purple, red and blue.
      • Using the brush end of the pen, make an inverted “U” that flares out a bit at the bottom.
      • Grab another color and draw a stripe just to the right of your first line. The stripes can touch or overlap on the edge. Let the stripe get wider as you move towards the bottom.
      • Repeat until the “U” shape is filled with stripes of color. 
      • Using the fine tip in the same color as your original U-shape, dot the outside to create needles.
      • Repeat the above steps next to your original U-shape, but make this one smaller in size and overlap it a bit. This will create the illusion of depth. 
      • Continue making different sizes and overlapping until the bottom 2/3 of the envelope is covered.
    4. Pick two harmonious colors for the blossoms. Using the fine tip, make clusters of upside-down teardrop shapes along the top each cactus.
    5. Select one of the lightest markers and use the fine tip to draw lines for the sky.
    6. Use your white Signo pen and marker’s fine tips to draw different patterns lining the cactus stripes. If you need some pattern ideas, check out the black and white handout (below). 
    7. With the white Signo pen, add needles to the edges.
    8. Finally, draw concentric teardrop lines inside the cactus blossoms using the white Signo pen.
    9. Remove post-it masks. Cover address area with a mailing label for cleaner edges (optional)
    10. You can play with the design even more by:
      • Mixing-in different types of cactus – add a barrel cactus or prickly pear.
      • Create a sea life version with coral, starfish, and seaweed. 
      • Finish the envelope by lining it with colorful paper. Envelope liner templates are available at Pennysmiths Paper.

    Black and White Handout

    Looking for more inspiration?

    1. Pinterest: Search Mail Art or Envelope Art
    2. Zentangles : https://craftwhack.com/how-to-zentangle
    3. YouTube: Search Alcohol Marker videos
    4. Link to the time-lapse video (below) of this technique: Cactus Mail Art

  • Rocker, Raver, or Funky Cowgirl?

    Rocker, Raver, or Funky Cowgirl?

    A hand painted Cowboy Kimono + faux fur collar + thrift store scarf = THREE-IN-ONE Fashion. Perfect if you like to dress for your current mood.

    I’ve been finding used denim jackets and converting them into Cowboy Kimonos for years. This year I wanted to collaborate with my oldest son who sews faux fur vests and hoodies. Together we made this neon turquoise faux fur collar.

    Fur Collar with Scarf

    Check-out the underside…there are loops to hold a scarf in place!

    The three elements can be combined for different looks.

    Both sleeves of the Cowboy Kimono are hand-painted with dimensional fabric paint.

    Sleeve detail

    This original, three-in-one outfit is now available for purchase.